Battery Tool Rack
Problem
I had begun to collect a specific brand of battery tools. They built a vast ecosystem of tools and batteries that all work together. So, I did not feel guilty buying more of the same brand. However, the tools began to pile up. I grew tired of digging through the tools to find what I wanted. It was also not good for some of them. The blades would get bent or they would get damaged in other ways.
Methodology
I wanted to turn scrap wood into a tool rack to hold the tools so that they would be easy to access. I watched a few YouTube videos and looked at other wood tool racks on an image search. They all basically used the same design with slots for the tools.
I also wanted a couple shelves for batteries, blades, bulbs, and other related bits and bobs.
I am sorry that I am being vague about the tools in the rack. Since this is on the internet for everyone to see, I am keeping that to myself.
Photos

This was the final woodworking project. I had only had a few cedar boards left to work with. These were scrap cedar fence boards. This is my before picture.
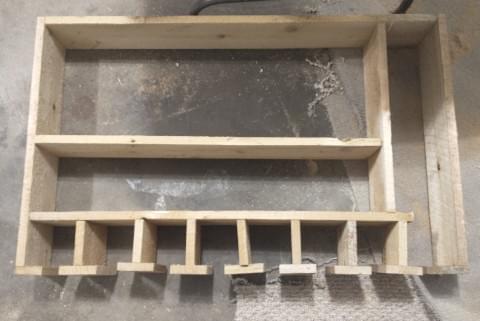
I built the slots with three inch pieces of wood connected to the bottom of a piece of wood like a “T”. I made the upright pieces of wood about 5 inches. The shelves and sides were basically determined by how much wood I had left over. I also had to make the shelves long enough for as many T’s as I made. I left the right side longer for a longer tool.
I did have to make some modifications after it was done. Some of the slots were too narrow. A quick trim with the saw and all was well. I also learned to put my tools in a particular order to balance loose slots with tight slots so that all tools have a little friction holding them in there.
I used cabinet screws to attach the T’s. I liked the fact that they had a large flat head. When those ran out, I was using whatever nails and screws I could find in the garage.
Amazing Tools
I really only used a square, circular saw, pencil, and tape measure on this project. I feel like these are pretty basic tools. The most amazing thing I did was use the square to guide the circular saw to make square cuts.
Surprise Issues
- I did not have enough wood. I used a lot of scraps from previous projects for the T’s at the bottom.
- I was not sure how I was going to hang it on the wall. I ended up adding a piece of wood at the top to screw through. The addition of this board also helped square it up.
- The initial version was a little flimsy in the last slot for the larger tool. I added a piece of wood as a support half way down. I put it in the same orientation as the board used for hanging.